Set site to Use WordPress HTTPS in ONLY 2 STEPS!
This is the year of the SSL certificate and you better make sure the server you are using for your site has one installed and you can Use WordPress HTTPS to load all website URLs. To do a simple test if your site has a SSL certificate installed is to visit your site using the format as follows: HTTPS://YOUR_DOMAIN.COM. If the site loads up with no issue then great, read on. If you get a warning message of any kind, please contact your host and make sure you get a SSL certificate installed right away to accomplish some very needed things that we will discuss shortly. You can also test your domain at the following link to see if there is an SSL certificate on your server. https://www.sslshopper.com/ssl-checker.html
One of our SUPER bloggers and WP Fix It agent, Nile Flores, wrote a detailed article on the importance of putting into use WordPress HTTPS on your site. Google may penalize you and surely rank your site lower in their search engine if you do not use WordPress HTTPS. See full article at https://www.wpfixit.com/google-requires-ssl-certificate.
So if you have a SSL certificate installed on your server and you are ready to use WordPress HTTPS, we want to run you through the next steps you must complete in order ot make sure your site is fully using the SSL certificate and all site paths are loading in HTTPS.
First of all here are the ingredients you need to Migrate WordPress:
- Site hosted on a server with an active SSL certificate installed
- Sour Patch Kids…just kidding but they are GOOD to have always!
#1 FORCE ALL SITE VISITS TO USE WORDPRESS HTTPS
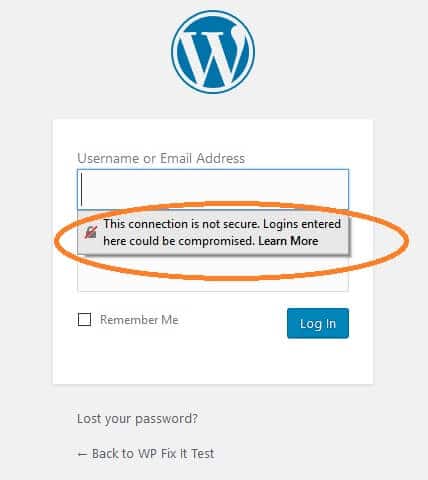
Once you are loading HTTPS there is not need to have your site still load in HTTP mode. This step will make sure that no matter what version of your site domain a visitor tries to use it will always use WordPress HTTPS and load each and every URL on your site with the https:// prefix. Check out the image below. This is the warning message you will see if you try to log into a site that is not setup to use WordPress HTTPS.

We are going to install a free plugin named Really Simple SSL. Go to Plugins > Add New and search for Really Simple SSL. Install and activate. Now look for message box at the top of the page that says GO AHEAD ACTIVATE SSL. You can go ahead and click on this. It will mostly likely log you out because it has already made sure that all site visits are set to use WordPress HTTPS. Simply log back in.

#2 ADJUST ALL SITE URLS TO USE WORDPRESS HTTPS
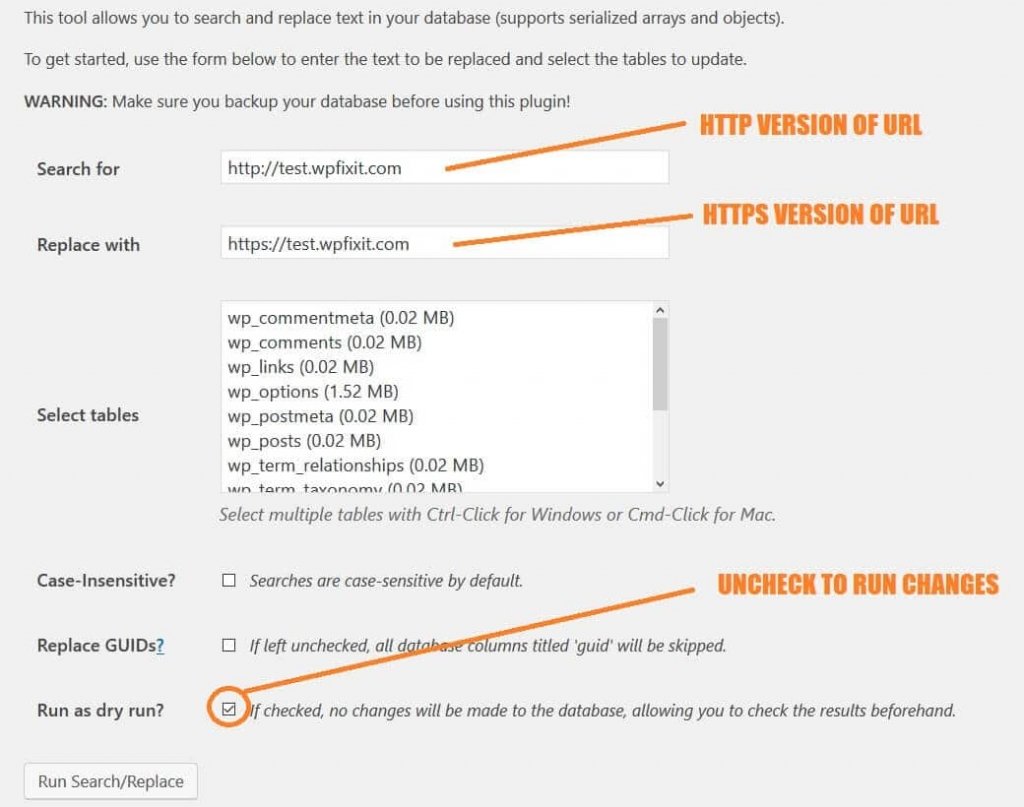
OK we are half way there. Now we just need to be certain that all URL paths in the database are set to use WordPress HTTPS and not set to HTTP. We will do this using a free plugin named Better Search and Replace. Go to Plugins > Add New and search for Better Search and Replace. Install and activate. Now travel over to Tools > Better Search and Replace. This is so cool. See image below of what to enter and where.

That is it. YOU DID IT. Your site is now set to use WordPress HTTPS.
Let Us Setup Your WordPress Site In HTTPS Mode
HTTPS Service
It is so important that your site loads using HTTPS. This will make sure that is so.
The post Set site to Use WordPress HTTPS in Only 2 Steps! appeared first on WP Fix It.
This content was originally published here.


