Semantic keyword clustering can help take your keyword research to the next level.
In this article, you’ll learn how to use a Google Colaboratory sheet shared exclusively with Search Engine Journal readers.
This article will walk you through using the Google Colab sheet, a high-level view of how it works under the hood, and how to make adjustments to suit your needs.
But first, why cluster keywords at all?
Common Use Cases For Keyword Clustering
Here are a few use cases for clustering keywords.
Faster Keyword Research:
Paid Search Campaigns:
Here’s an example of the script clustering similar questions together, perfect for an in-depth article!
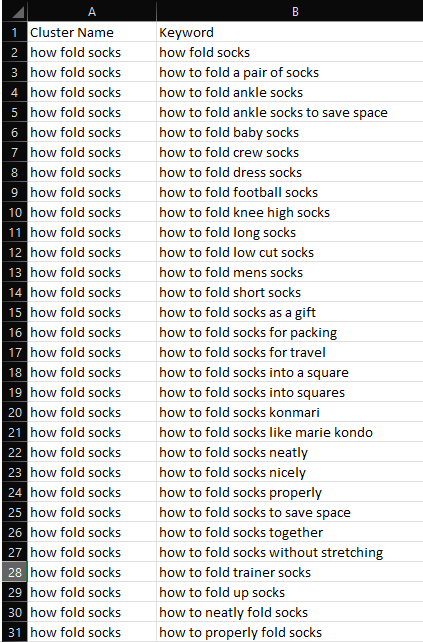 Screenshot from Microsoft Excel, February 2022
Issues With Earlier Versions Of This Tool
If you’ve been following my work on Twitter, you’ll know I’ve been experimenting with keyword clustering for a while now.
Earlier versions of this script were based on the excellent PolyFuzz library using TF-IDF matching.
While it got the job done, there were always some head-scratching clusters which I felt the original result could be improved on.
Words that shared a similar pattern of letters would be clustered even if they were unrelated semantically.
For example, it was unable to cluster words like “Bike” with “Bicycle”.
Earlier versions of the script also had other issues:
Semantic Keyword Clustering Using Deep Learning Natural Language Processing (NLP)
Fast forward four months to the latest release which has been completely rewritten to utilize state-of-the-art, deep learning sentence embeddings.
Check out some of these awesome semantic clusters!
Notice that heated, thermal, and warm are contained within the same cluster of keywords?
 Screenshot from Microsoft Excel, February 2022
Or how about, Wholesale and Bulk?
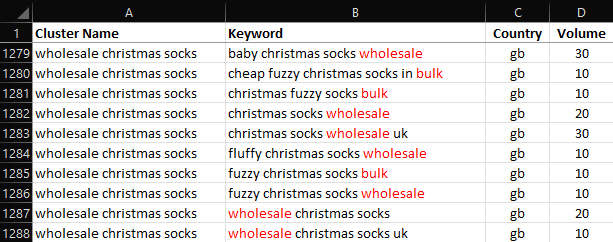 Screenshot from Microsoft Excel, February 2022
Dog and Dachshund, Xmas and Christmas?
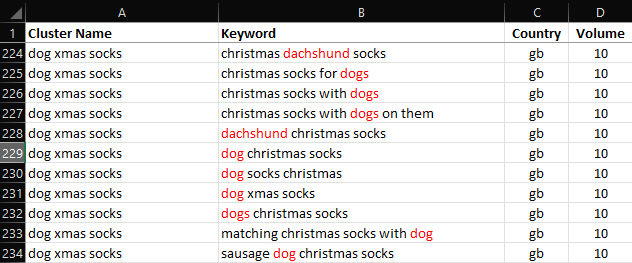 Screenshot from Microsoft Excel, February 2022
It can even cluster keywords in over one hundred different languages!
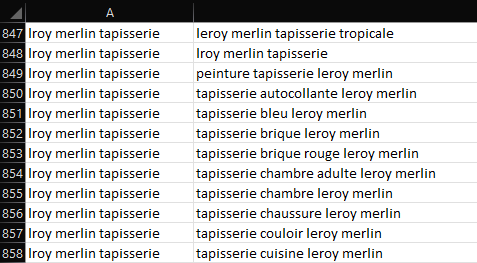 Screenshot from Microsoft Excel, February 2022
Features Of The New Script Versus Earlier Iterations
In addition to semantic keyword grouping, the following improvements have been added to the latest version of this script.
How To Use The Script In Five Steps (Quick Start)
To get started, you will need to click this link, and then choose the option, Open in Colab as shown below.
 Screenshot from Google Colaboratory, February 2022
Change the Runtime type to GPU by selecting Runtime > Change Runtime Type.
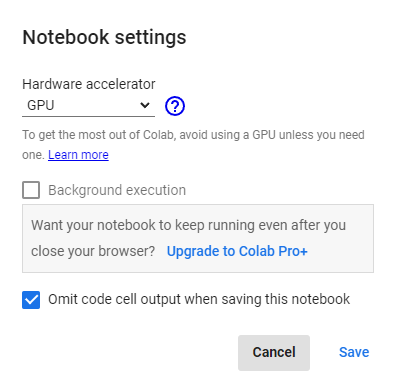 Screenshot from Google Colaboratory, February 2022
Select Runtime > Run all from the top navigation from within Google Colaboratory, (Or just press Ctrl+F9).
 Screenshot from Google Colaboratory, February 2022
Upload a .csv file containing a column called “Keyword” when prompted.
 Screenshot from Google Colaboratory, February 2022
Clustering should be fairly quick, but ultimately it depends on the number of keywords, and the model used.
Generally speaking, you should be good for 50,000 keywords.
If you see a Cuda Out of Memory Error, you’re trying to cluster too many keywords at the same time!
(It’s worth noting that this script can easily be adapter to run on a local machine without the confines of Google Colaboratory.)
The Script Output
The script will run and append clusters to your original file to a new column called Cluster Name.
Cluster names are assigned using the shortest length keyword in the cluster.
For example, the cluster name for the following group of keywords has been set as “alpaca socks” because that is the shortest keyword in the cluster.
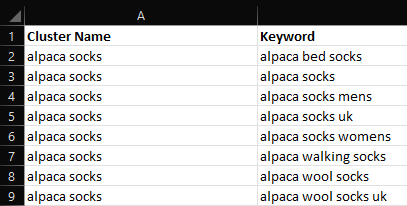 Screenshot from Microsoft Excel, February 2022
Once clustering has been completed, a new file is automatically saved, with clustered appended in a new column to the original file.
How The Key Clustering Tool Works
This script is based upon the Fast Clustering algorithm and uses models which have been pre-trained at scale on large amounts of data.
This makes it easy to compute the semantic relationships between keywords using off-the-shelf models.
(You don’t have to be a data scientist to use it!)
In fact, whilst I’ve made it customizable for those who like to tinker and experiment, I’ve chosen some balanced defaults which should be reasonable for most people’s use cases.
Different models can be swapped in and out of the script depending on the requirements, (faster clustering, better multi-language support, better semantic performance, and so on).
After a lot of testing, I found the perfect balance of speed and accuracy using the all-MiniLM-L6-v2 transformer which provided a great balance between speed and accuracy.
If you prefer to use your own, you can just experiment, you can replace the existing pre-trained model with any of the models listed here or on the Hugging Face Model Hub.
Swapping In Pre-Trained Models
Swapping in models is as easy as replacing the variable with the name of your preferred transformer.
For example, you can change the default model all-miniLM-L6-v2 to all-mpnet-base-v2 by editing:
transformer = ‘all-miniLM-L6-v2’
transformer = ‘all-mpnet-base-v2‘
Here’s where you would edit it in the Google Colaboratory sheet.
 Screenshot from Google Colaboratory, February 2022
The Trade-off Between Cluster Accuracy And No Cluster Groups
A common complaint with previous iterations of this script is that it resulted in a high number of unclustered results.
Unfortunately, it will always be a balancing act between cluster accuracy versus the number of clusters.
A higher cluster accuracy setting will result in a higher number of unclustered results.
There are two variables that can directly influence the size and accuracy of all clusters:
I have set a default of 85 (/100) for cluster accuracy and a minimum cluster size of 2.
In testing, I found this to be the sweet spot, but feel free to experiment!
Here’s where to set those variables in the script.
 Screenshot from Google Colaboratory, February 2022
That’s it! I hope this keyword clustering script is useful to your work.
This content was originally published here.

![Semantic Keyword Clustering For 10,000+ Keywords [With Script]](https://creativwebtools.com/wp-content/uploads/2022/02/semantic-keyword-clustering-for-10000-keywords-with-script-1024x538.png)


